Robot
This section introduces all the details about Robot related nodes opeartions.
Move Joints Node
The "Move Joints" node is a fundamental module in the WOS system. It enables precise control over the robotic joints directly from the graphical interface.
Step-by-Step Guide
-
Drag and Drop:
- Drag the "Move Joints" module into the workspace area.
-
Accessing Parameters:
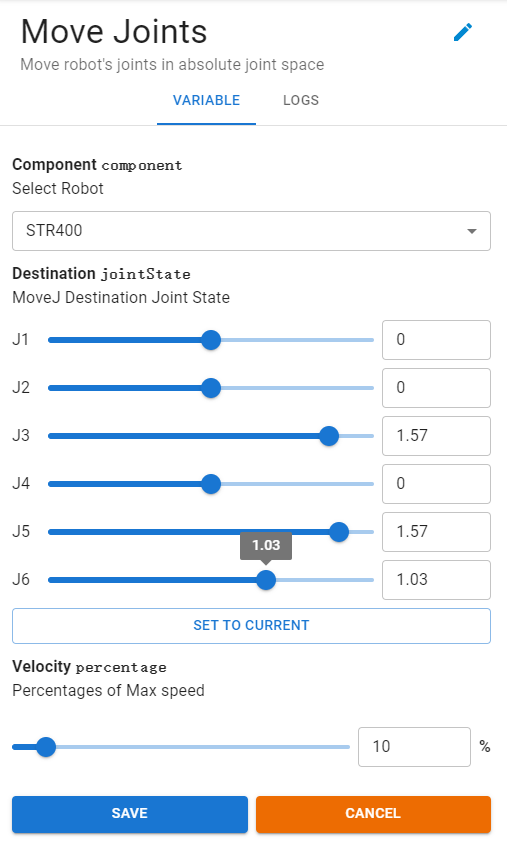
- Double-click on the module. This action will prompt a parameter editing window as shown above.
Configuring the Module
-
Selecting the Robot:
- From the first dropdown menu labeled
Component, choose the robot for operation. Here, the example uses STR400 as the selected robot.
- From the first dropdown menu labeled
-
Setting the Destination:
- Upon selecting a robot, the
Destinationoptions corresponding to the degrees of freedom will appear. These options allow you to set the target positions for each joint.
- Upon selecting a robot, the
-
Current Pose Utilization:
- The
SET TO CURRENTbutton fetches and displays the current pose of the robot, which can then be adjusted as needed.
- The
-
Speed Adjustment:
- Speed settings are based on the maximum speeds of the respective robot’s motors. During operation, no motor will exceed the set percentage of its maximum speed. It is often recommended to start trials at 10% speed or in a simulation environment, as 100% speed implies very rapid movement.
Integrated Trajectory Planning
The "Move Joints" node includes built-in trajectory planning. This feature ensures that all joints start their movement in coordinated harmony, following an absolutely smooth path, and reach their destinations simultaneously.
This ensures not only the efficiency but also the safety of operations, minimizing mechanical stress and potential errors during complex maneuvers.
Move Cartisian Node
The "Move Cartesian Node" allows for precise control over the robot's end-effector in Cartesian space, similar to how the "Move Joints" node operates but with a focus on Cartesian coordinates rather than individual joint positions.
Accessing Parameters
To configure and use the Move Cartesian Node, follow the steps you would for the Move Joints node to select and set up the robotic arm components you wish to control.
Configuring the Module
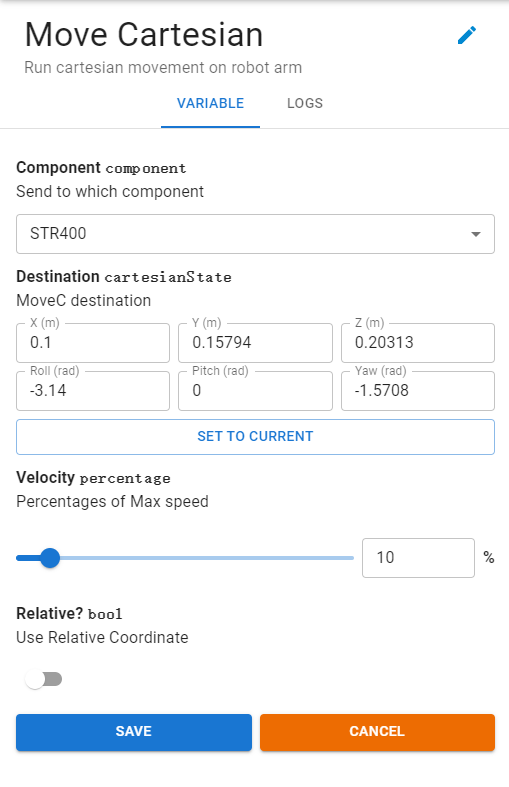
Setting the Destination
-
Destination: This refers to a Cartesian State defined by WOS.
- Click the
SET TO CURRENTbutton to automatically fetch the current position of the robot's end-effector and populate the input fields with these values.
- Click the
-
Options for Destination
- Relative Mode Disabled: If the
Relative?toggle is disabled, the Destination defines the transformation from the global coordinate system to the end-effector (EE) coordinate system. - Relative Mode Enabled: If enabled, the Destination represents the delta values from the current EE coordinates to the target EE coordinates.
- Relative Mode Disabled: If the
-
Speed Settings
- The speed settings function identically to those in the Move Joints node, allowing you to control the velocity at which the robot moves to the target position.
-
Trajectory Planning
- Just like the Move Joints node, the Cartesian Move Node performs a single inverse kinematics (IK) analysis from the target Cartesian coordinates to translate them into joint space, followed by interpolation to ensure smooth motion.
⚠️Warning: Multiple solutions are possible with redundant mechanical structures, meaning that trajectories formed by the same Cartesian Move Node may vary with each execution, although they will always lead to the end-effector reaching the specified destination.
Move in Line Node
The Move in Line(MOVEL) command is essential for applications requiring precise, linear motion paths. This node commands the robotic arm to move directly along a straight line from its current position to a specified target position.
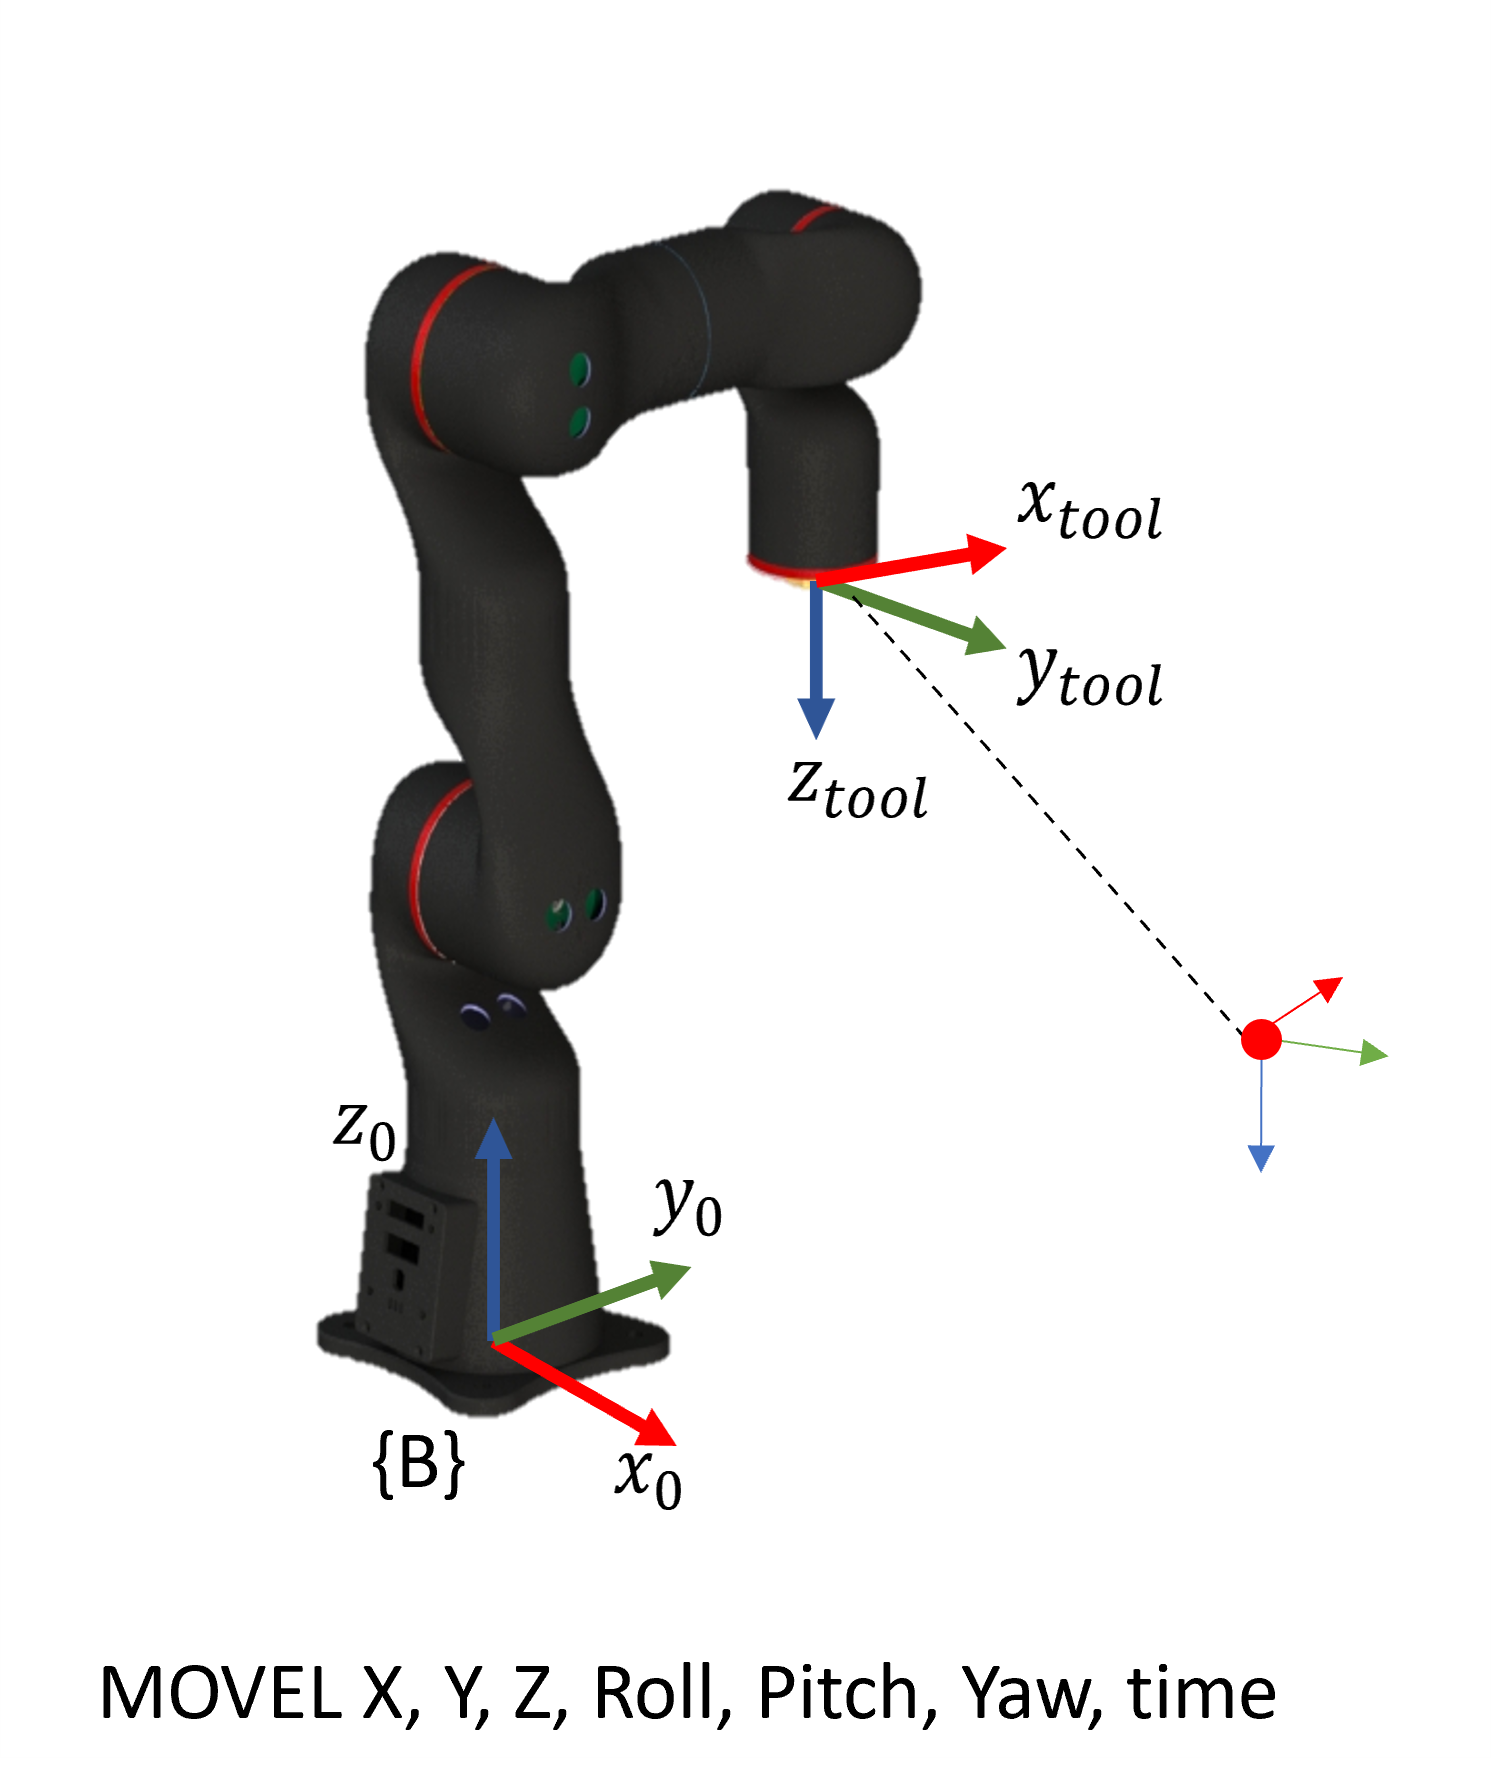
Move in Line ensures that the movement starts and ends at zero speed, facilitating smooth transitions and precise positioning. This node is particularly useful in tasks where maintaining a linear trajectory is critical, such as in assembly lines or when handling delicate materials.
Command Features
- Target Position's Cartesian Coordinates: Involves three translations (X, Y, Z) and three Euler angles (Roll, Pitch, Yaw) relative to the robotic arm's base B, with rotations occurring in the specified order.
- Duration Parameter: Specifies the duration required to move from the current position to the target position, measured in seconds. This parameter is crucial for synchronizing movements in automated sequences.
Editing Interface
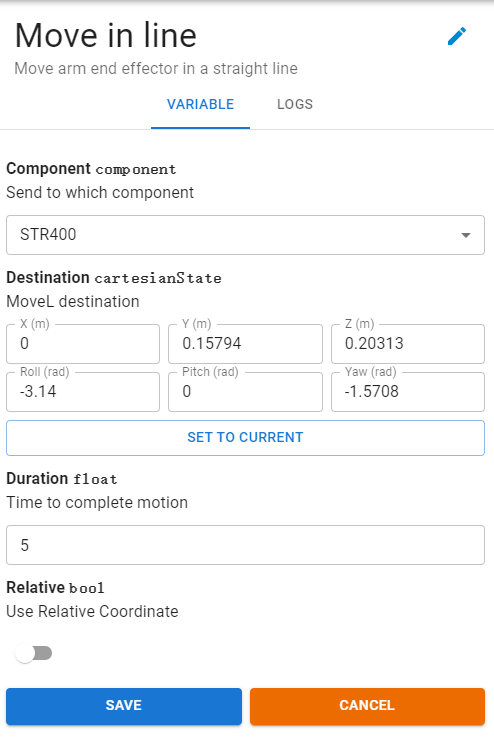
-
Parameters Configuration
-
While many parameters are consistent with those found in the
Move Cartesiannode, there are specific distinctions in theMove in Linenode:- Trajectory Planning: Unlike other motion commands,
Move in Line’s trajectory planning is performed entirely within Cartesian space, ensuring a direct path from start to finish. - Duration Instead of Speed Percentage: Rather than using a percentage of maximum speed,
Move in Lineuses the duration of the move as a control parameter. This approach allows for precise control over the time it takes to move from the current position to the target, ensuring the robotic arm moves at the exact required pace.
- Trajectory Planning: Unlike other motion commands,
-
-
Applications
- This linear motion capability is invaluable in scenarios where precision and timing are paramount. It is often utilized in environments where robotic actions need to be tightly coordinated with other processes, or where the path precision impacts product quality.
Move in Sequence Node
The Move in Sequence (MOVES) command extends the functionality of the Move in Line (MOVEL) by facilitating continuous multi-point movements. This command is crucial for applications that require seamless transitions between multiple points in a defined trajectory.
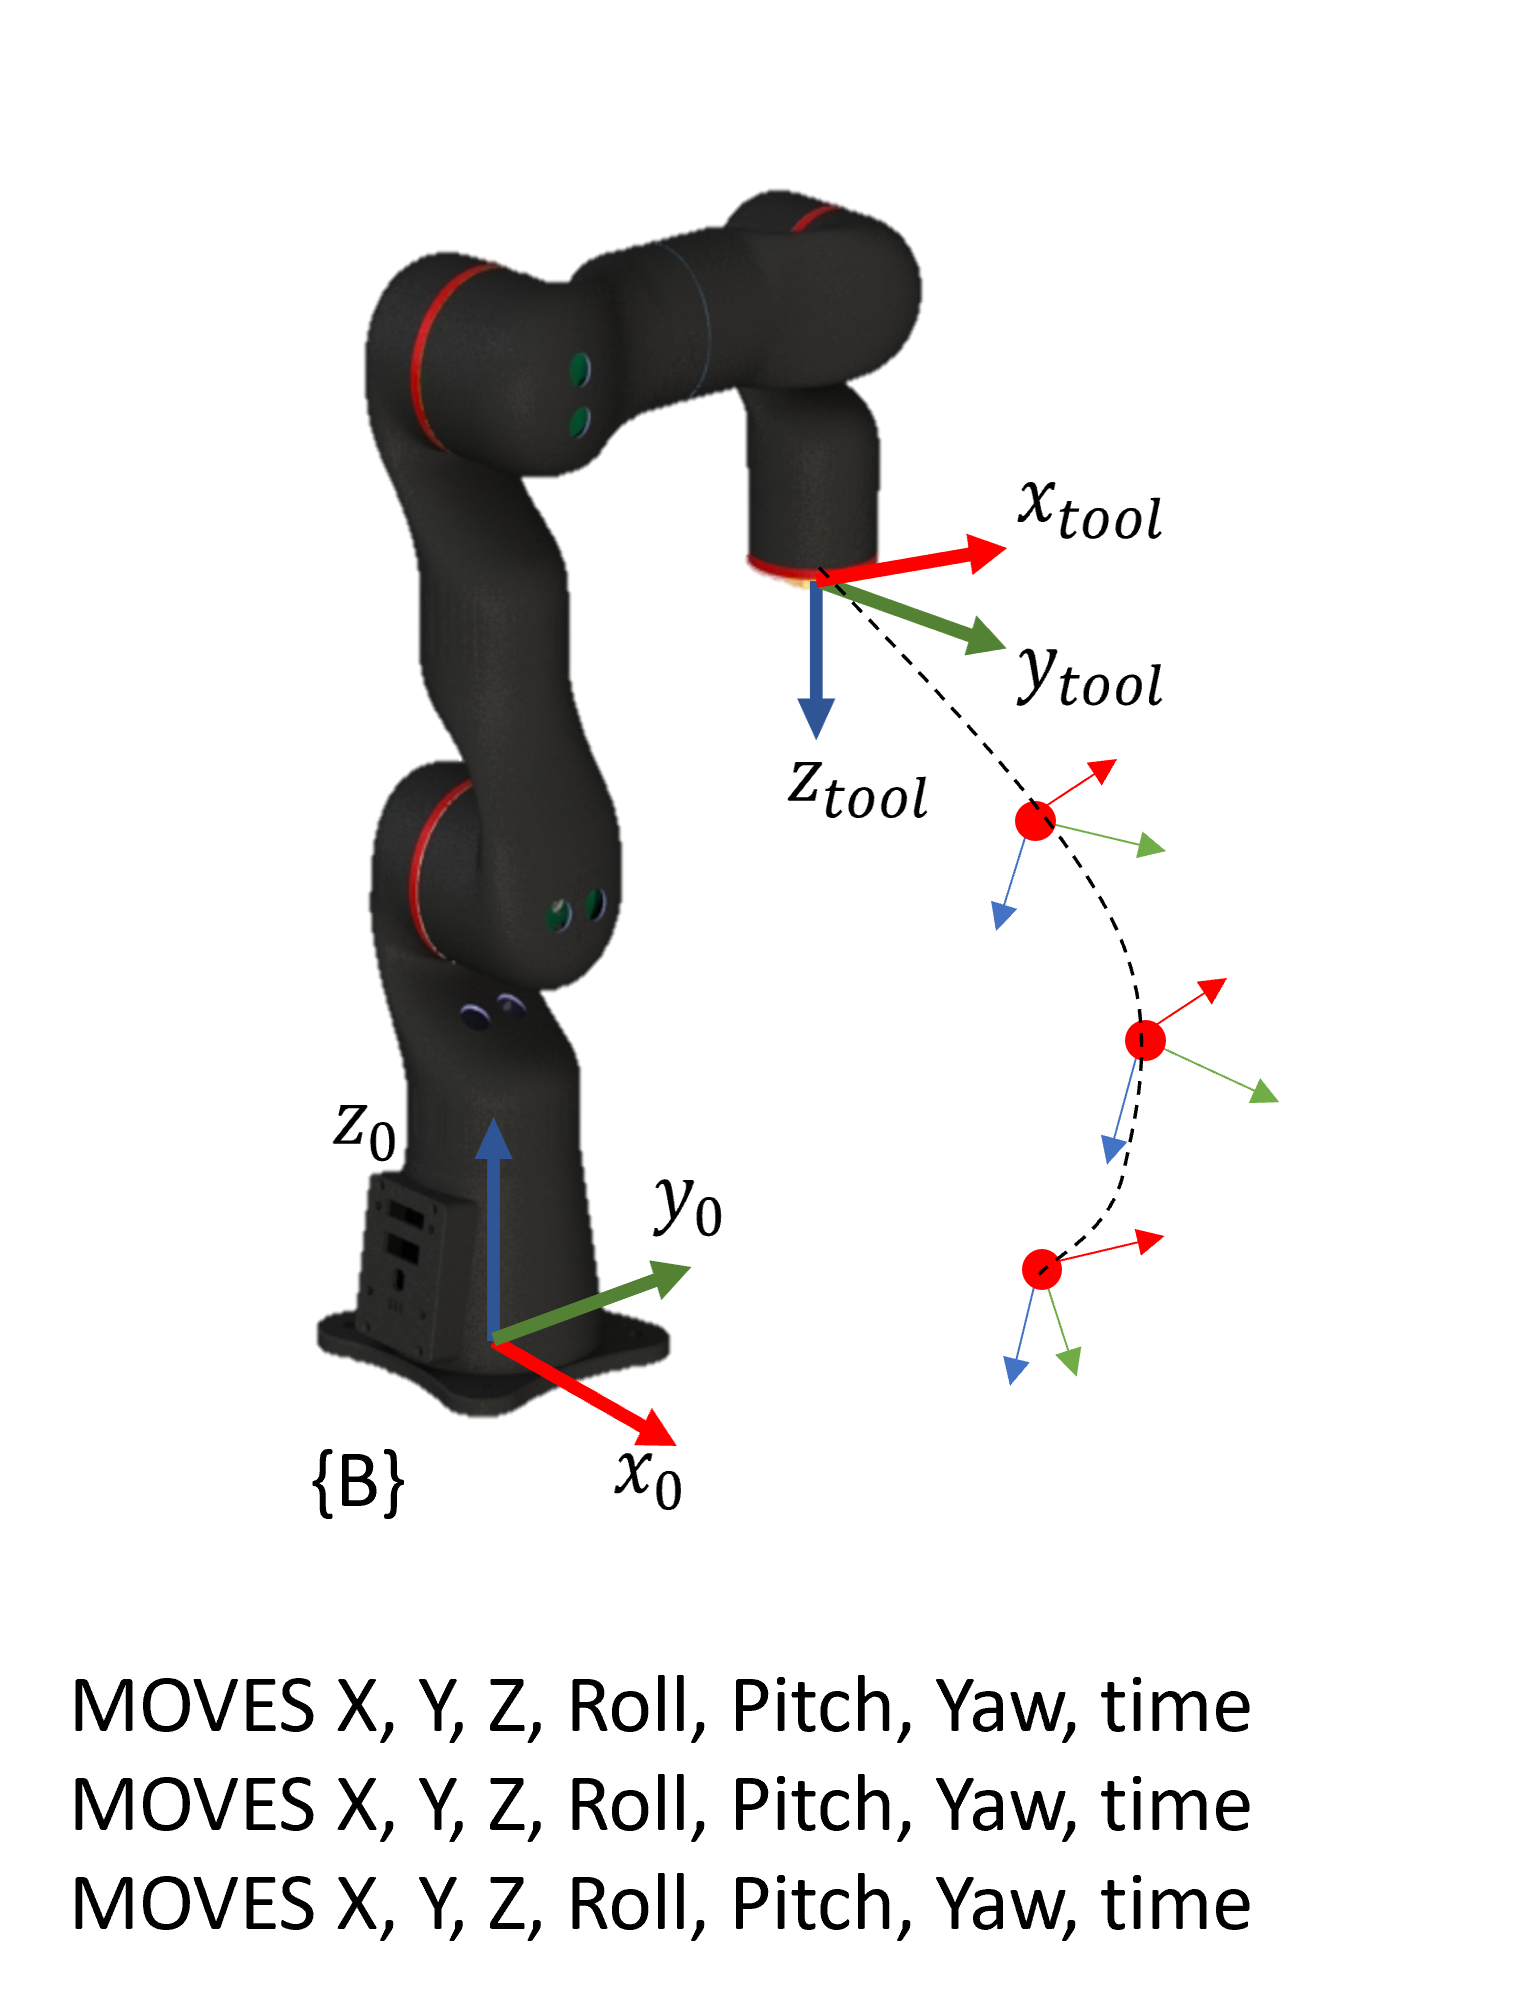
- Single Command: When the command includes only one
Move in Sequenceoperation, it functions identically to aMove in Line, moving the robot arm in a straight line to a specified target position. - Multiple Commands: In sequences with multiple
Move in Sequencecommands, the robot will progress from the starting point to subsequent points directly, maintaining continuous velocity and acceleration, even at each point’s end position.
Trajectory Planning
- Smooth Movement: Ensure the robotic arm maintains continuous position, velocity, and acceleration throughout the motion path.
- Trajectory Accuracy: The actual trajectory should closely align with the planned trajectory.
- Efficiency: Aim to minimize the execution time while maintaining accuracy and smoothness of the movement.
Editing Interface
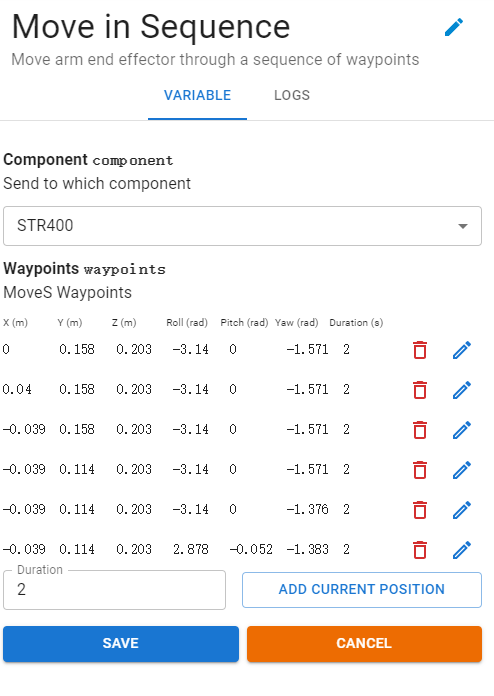
- Component Selection: Choose the robotic arm component that you wish to control through the
Move in Sequencecommand. - Adding Waypoints:
- Realtime Control Pad: Manually manipulate the robot to desired positions and use the
ADD CURRENT POSITIONbutton to record each waypoint. - Manual Mode: Switch to manual mode via the robot’s action tab, physically position the robot arm by hand at each desired point, and record the position.
- Realtime Control Pad: Manually manipulate the robot to desired positions and use the
Duration and Adjustment
- Setting Duration: Specify the duration to reach each waypoint directly in the interface.
- Adjusting Waypoints: Fine-tune the waypoints' values using the Duration field or the ✏ edit button to ensure precise control over the motion path.
Note: When in manual mode, the STR400’s joints become passive, requiring manual support to position them. This mode is essential for manually setting waypoints without active motor resistance.
Applications
- Paint Spraying Programming: Ideal for programming complex paint jobs that require smooth, continuous motion across multiple points.
- Optimizing Motion Trajectories: Useful in operations that demand optimized speed and fluid movement, as
Move in Sequenceallows the arm to move through waypoints without stopping, reducing overall operation time and enhancing efficiency.
By understanding and utilizing the Move in Sequence node, users can achieve sophisticated motion planning that combines precision, efficiency, and fluidity, making it invaluable for complex automated tasks.
WScript
WScript is a unique coding method within the WOS for controlling robotic arms by compressing complex series of actions into a single node, facilitating easy storage and sharing.
Key words
WScript integrates several command types that correspond to the various control nodes discussed earlier:
MOVEJ- Move JointsMOVEC- Move CartesianMOVEL- Move in LineMOVES- Move in Sequence
Specific Commands
WScript supports the following main commands, categorized by absolute (A) and relative (R) positioning:
A:MOVEJ- Move from the current position to the given absolute rotation joint angle within the specified time.A:MOVEC- Moves the robotic arm to a predetermined absolute Cartesian coordinate position from its current position within a specified time, following a non-linear path.A:MOVEL- Moves the robotic arm to a predetermined absolute Cartesian coordinate position from its current position within a specified time, following a linear path.A:MOVES- Move from the current endpoint position through a series of given absolute Cartesian coordinate positions within the specified time.R:MOVEJ- Move from the current position to the given relative rotation joint angle within the specified time.R:MOVEC- Moves the robotic arm to a relative Cartesian coordinate position from its current position within a specified time, via a non-linear path.R:MOVEL- Moves the robotic arm to a relative Cartesian coordinate position from its current position within a specified time, via a linear path.R:MOVES- Move from the current endpoint position through a series of given relative Cartesian coordinate positions within the specified time.WAIT- Wait for the specified time.
Prefixes
- "A" stands for absolute positioning, relative to the robotic arm's base coordinate.
- "R" indicates relative positioning, relative to the end position coordinate at the beginning of the action.
Each line of a WScript can contain one command. By combining these commands, you can execute more complex actions.
⚠️Warning: If the specified action cannot be executed by the robotic arm, such as being out of the workspace, the software will not execute the trajectory. An error message will display in the terminal if the trajectory verification fails. If successful, clicking the start button will begin immediate execution. Ensure there are no obstacles around the robotic arm during operation.
WScript Example
A: MOVEL X1, Y1, Z1, Roll1, Pitch1, Yaw1, Time1
A: MOVEL X2, Y2, Z2, Roll2, Pitch2, Yaw2, Time2
WAIT Time3
A: MOVES X4, Y4, Z4, Roll4, Pitch4, Yaw4, Time4
A: MOVES X5, Y5, Z5, Roll5, Pitch5, Yaw5, Time5
A: MOVES X6, Y6, Z6, Roll6, Pitch6, Yaw6, Time6
- Explanation
- The robotic arm moves from its current position to position 1 in Time1, traveling in a straight line with the speed ending at zero.
- It then moves straight to position 2 in Time2.
- The arm remains stationary at position 2 for Time3.
- Subsequently, the arm undertakes a continuous multi-point movement, moving to position 4 in Time4, to position 5 in Time5, and finally to position 6 in Time6, with the velocity tapering to zero at the end of each segment.
Editor Interface
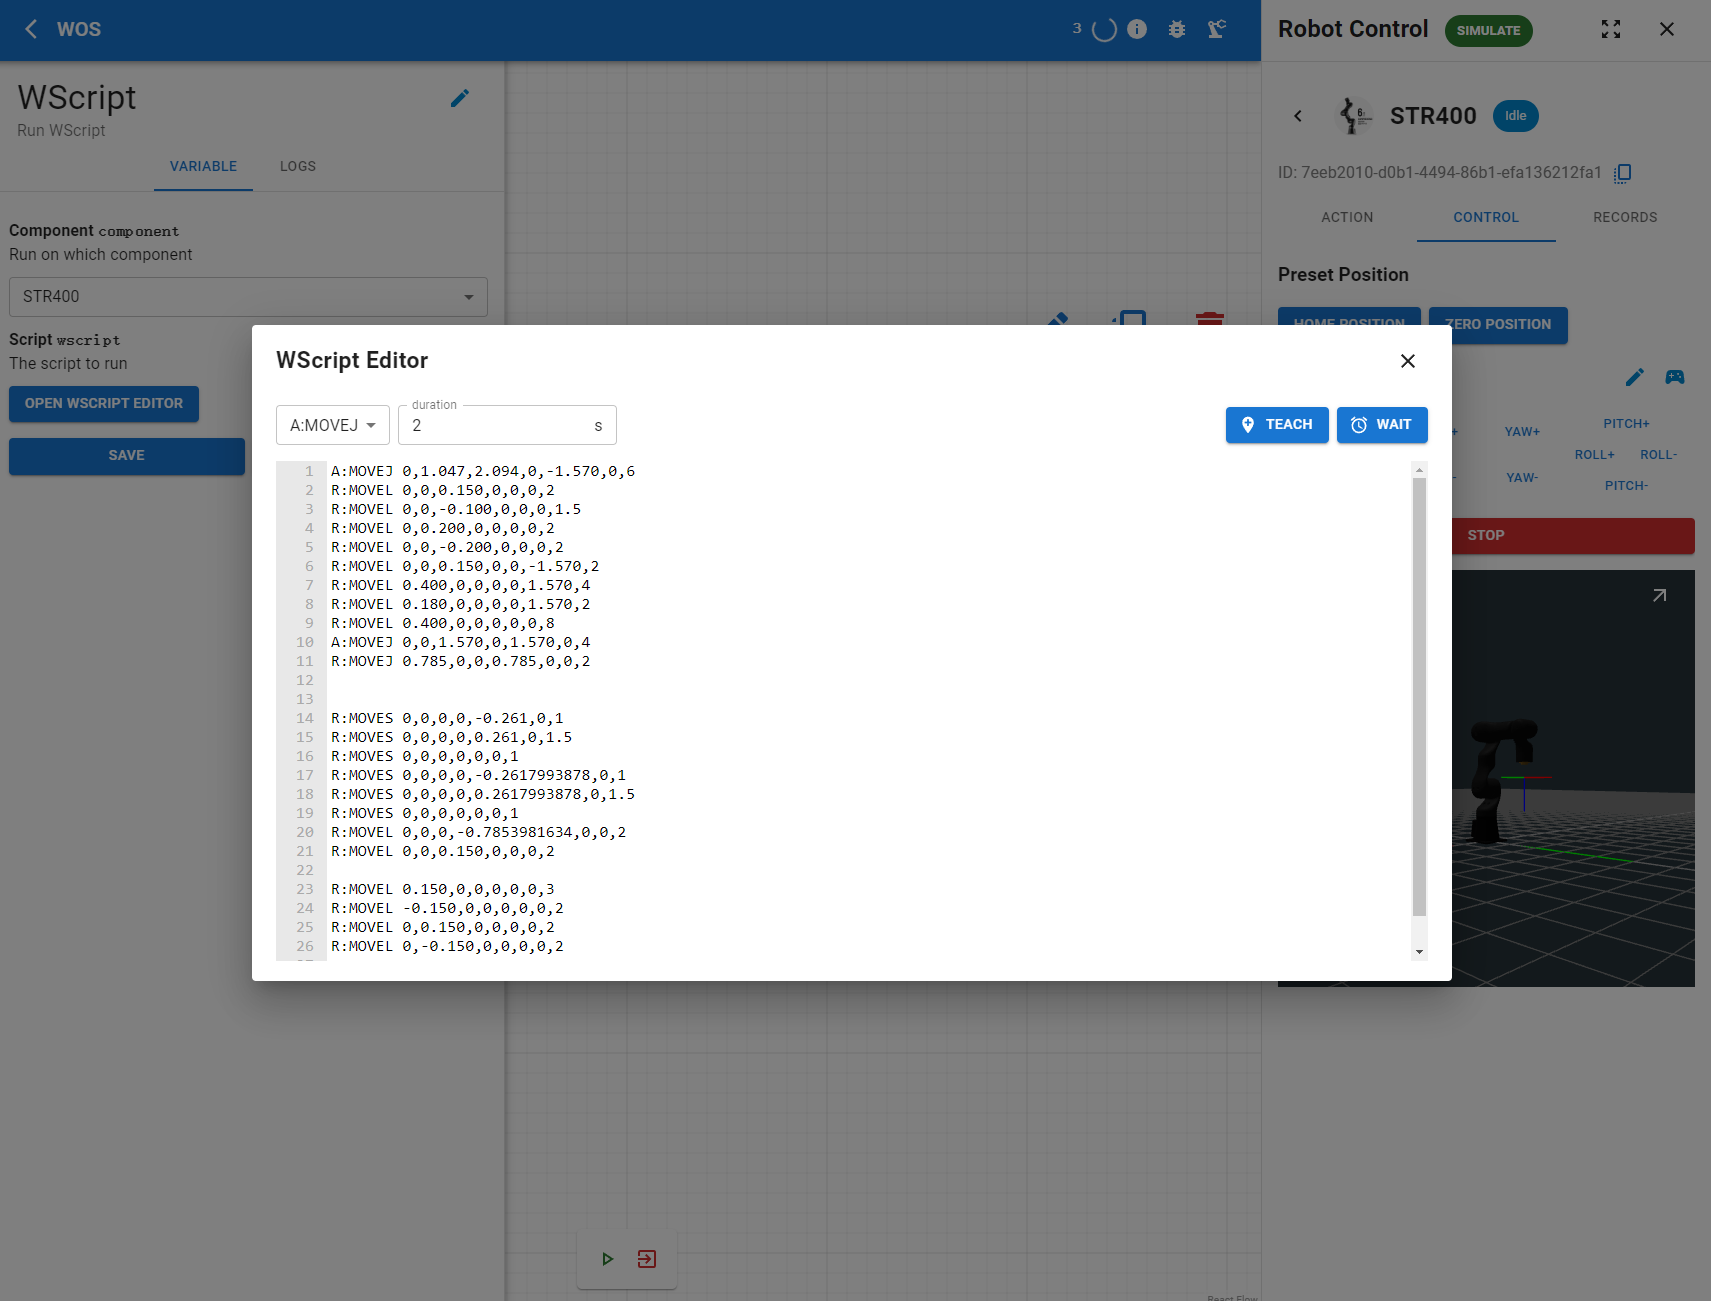
The WScript Editor provides a user-friendly interface for entering and managing scripts that control the robotic movements. After selecting the desired component for operation, the WScript editor can be accessed for detailed script customization.
Using the WScript Editor
To begin scripting in the WScript Editor:
-
Open the Editor:
- Select the component you wish to control.
- Click on
OPEN WSCRIPT EDITORto launch the editor, as shown above.
-
Enter and Save Scripts:
- Type your script into the text box provided within the editor.
- Once you have entered your commands, press the
Xbutton to exit and save your script. The script is now ready to be used to control the robotic movements.
TEACH Feature
The WScript Editor also includes a TEACH function, which simplifies the script creation process:
- Record Current Positions:
- Use the TEACH feature to record the current positions of the robot.
- This function will automatically generate a script line using the
A:MOVEJformat for each recorded position.
This automated scripting tool is particularly useful for users new to robotic programming or those who prefer a more intuitive approach to script generation.
By utilizing the WScript Editor and its features, users can efficiently create and manage complex scripts to automate and optimize robotic functions within the WOS environment.